5 Design Basics for Staging your Home

Whether you’re about to sell your home or want to rent it out, these 5 tips will help your home look more appealing to buyers:


UczqoBUg.jpg

Improve Curb Appeal: 

First impressions are everything! That first picture of your home will leave buyers with a lasting vision of your home— so make sure it’s a good one. (For specifics— Check out my reel all about boosting curb appeal.)

Declutter:

This is probably the most important tip! Declutter every room in the house. Get rid of unnecessary decor, furniture or personal items. Clear all surfaces & make it clean!


Style your dining table:

While still keeping it simple! (remember no clutter!) A beautiful flower arrangement is enough.
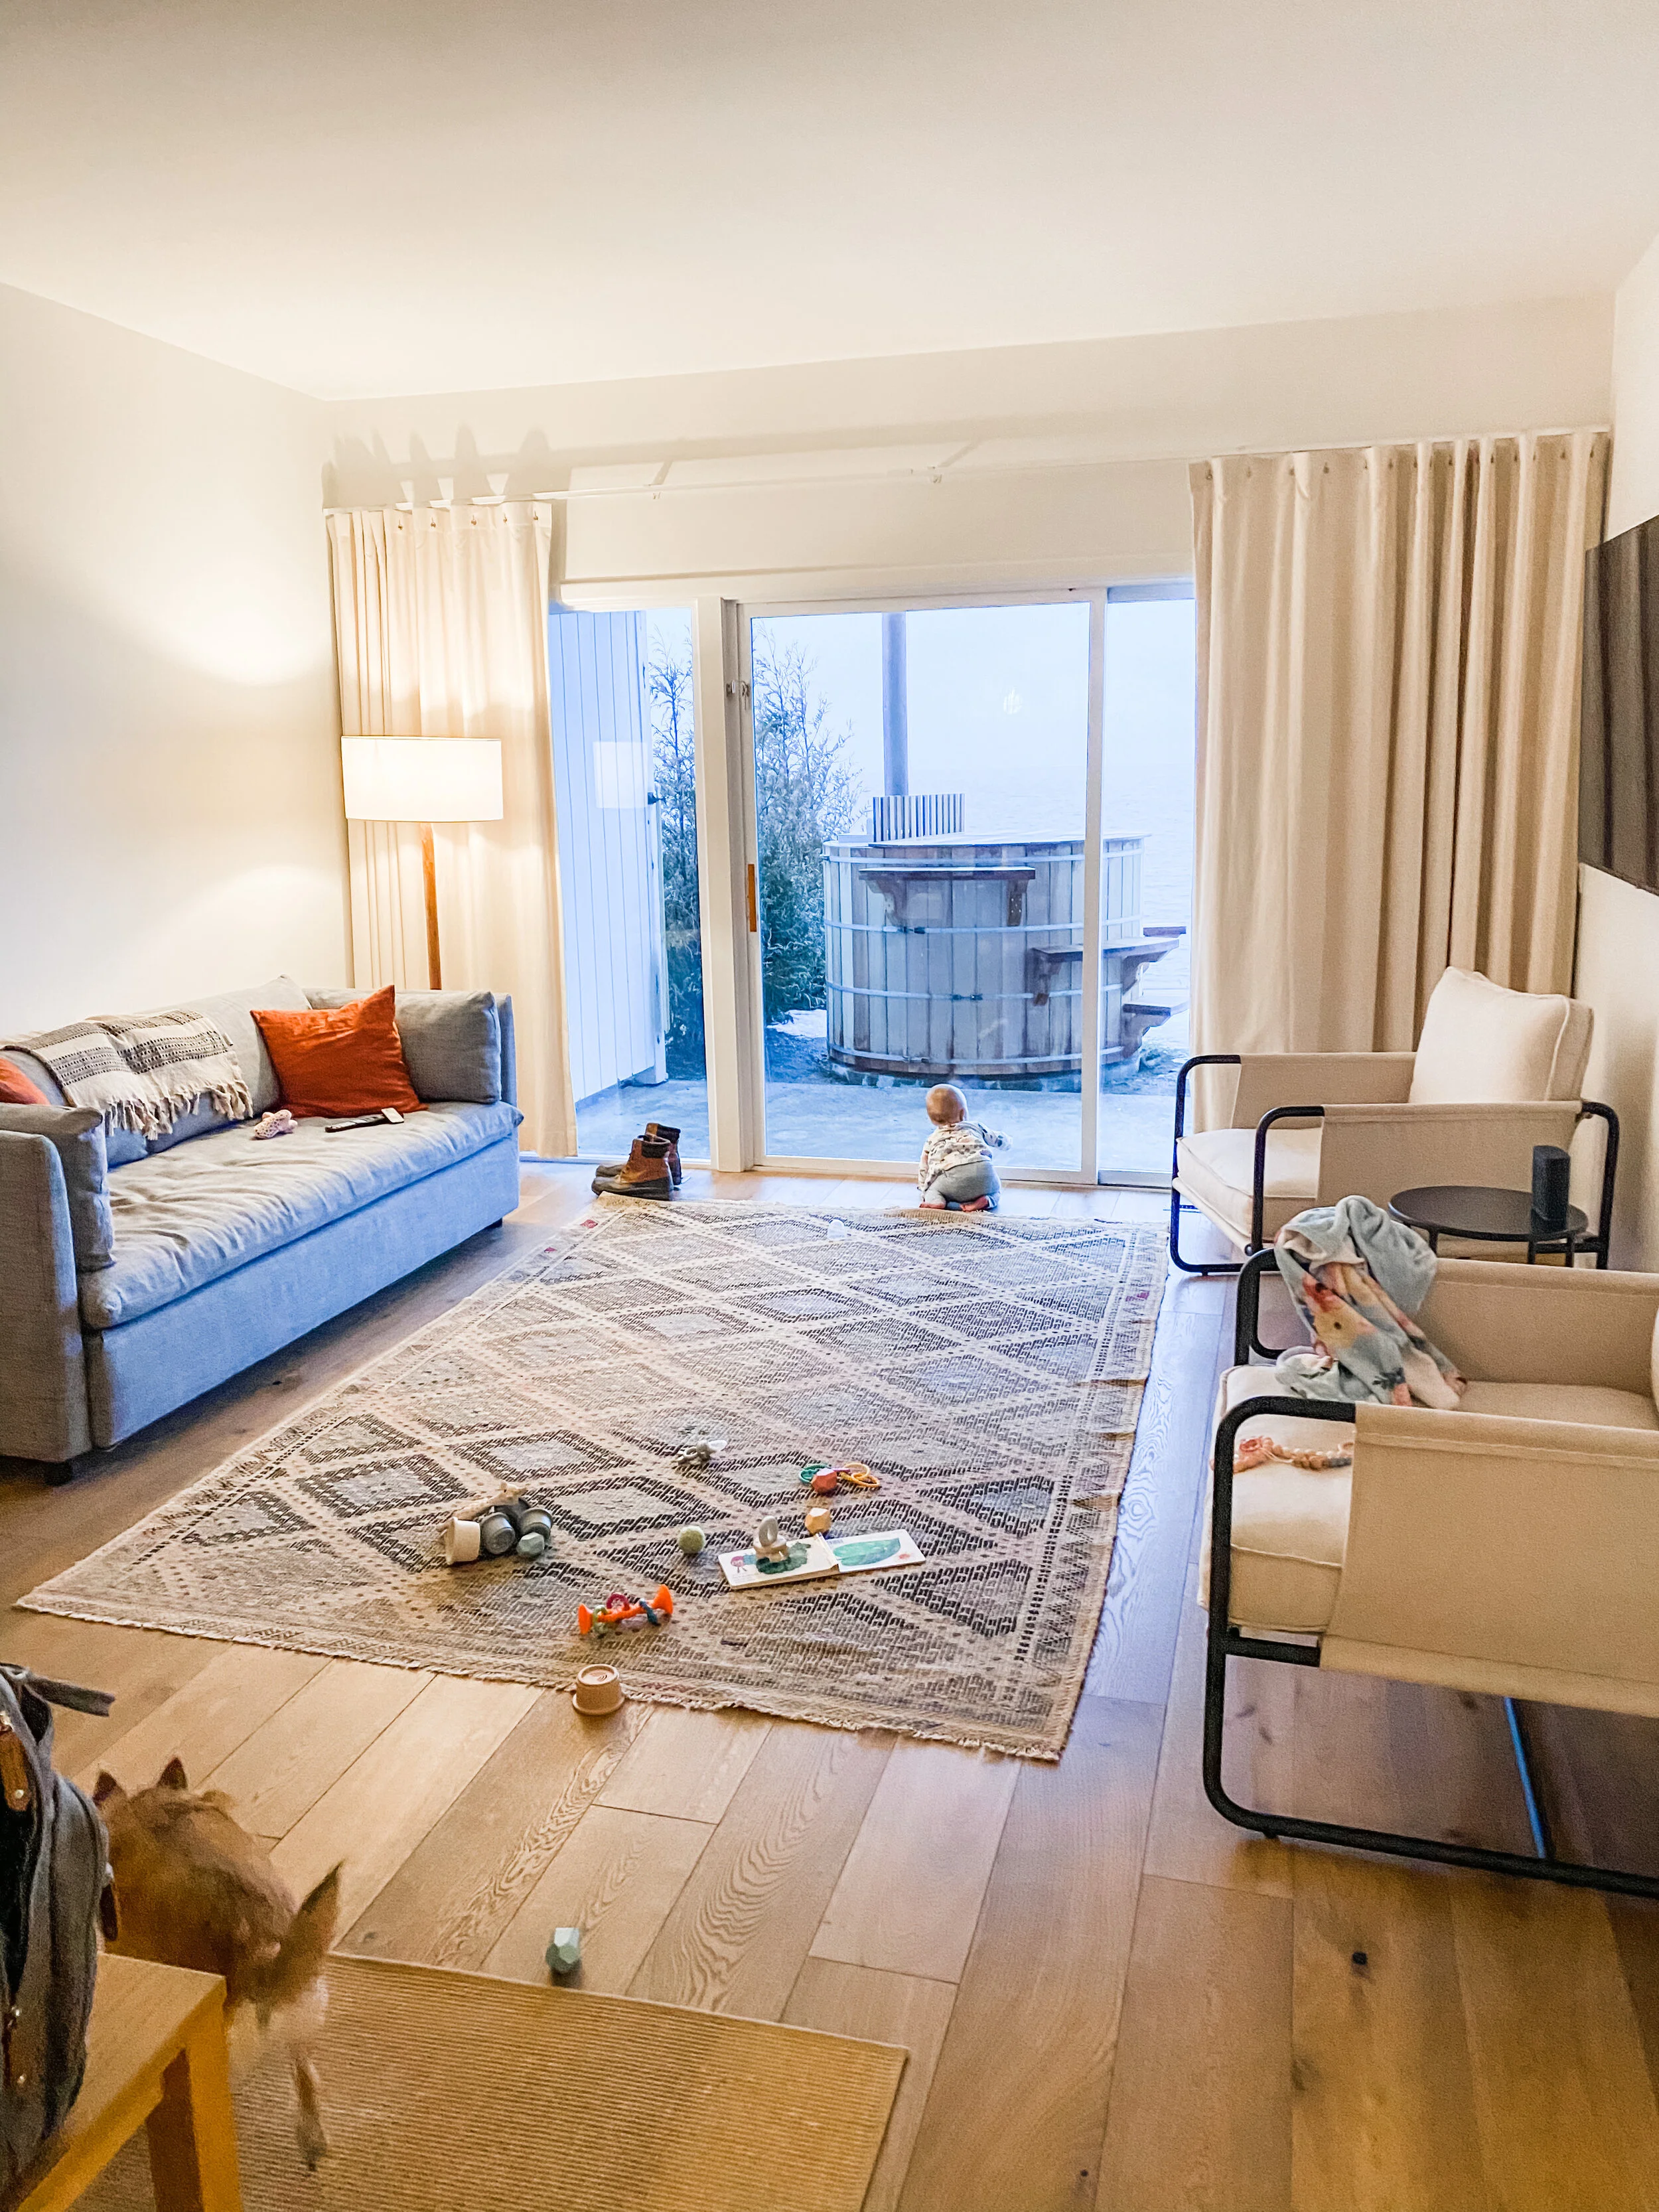
Go for Neutrals:

Not everyone will love the bold color on your walls or the bright pattern on your duvet. Neutrals help buyers to see beyond your decor choices and allows them to envision themselves living in your space. So when in doubt, layer on the neutrals!

Stage the outdoors:

By staging a patio or backyard, you’re adding to the livable space of your home. Add garden lights & comfortable seating for a basic upgrade. If you’re renting, make sure to include a grill and dining table with enough seating.


Like & Follow Jenna on Instagram for more real estate & design tips!

5 simple ways to improve your home's curb appeal

Every house that hits the market these days is getting a lot of attention. It's a great opportunity for you to maximize the price you get for your home. An easy way to do this is to make sure your home is irresistible to buyers (or renters!) from the moment they pull into the driveway.

Here are 5 simple ways you can improve your home’s curb appeal before the first Open House.

 
IMG_0067.JPG

Add Flowers

This is probably the simplest way to make your home stand out and look it’s best. If the season is right, go with classic Hamptons hydrangeas. You can go small with just two plants on either side of the front doors or steps…or go all out and line the front of your house for a real show stopper.

If that’s not your style, add some planters with seasonal flower or plants. Spring, go for Tulips & Daffodils. Winter you can use evergreens or have your local flower/plant shop create a special front step arrangement.

Whichever you decide, some color will liven up that first impression of your home.

Update Hardware


Power Wash the Exterior

The home we live in now was a fixer upper when we bought it. Last summer, we had the entire exterior power washed and it made it look like a brand new house! If your house has those classic Hamptons cedar shingles or siding, I highly recommend a power wash before your house hits the market.

Check out the difference it made with our house!


IMG_0068.JPG

Update the Mailbox

This one is so simple it’s often overlooked. An updated mailbox with easy to read numbers adds a noticeable polished touch. It definitely helps with first impressions and sets buyers up to expect good things once they step inside. This is another great spot to plan some flowers or greenery.

I realize, many Hamptons homes don’t have mailboxes— it’s still important to have some way of displaying the house number, especially now that your house is for sale. Add a post with the house numbers or get a number sign made off Etsy. Add some flowers and you’re good to go!

 
IMG_0069.JPG

Update Hardware

This can be a simple swap of the front door handles to something more modern or styled. For even more style, you can update the doorbell, light fixtures, and numbers on the house as well. Assess where your home is feeling the most tired and spend your money there.

Create an Inviting Entry

This is where you can get creative and show off a little of your personal style. Bare minimum— make sure you have a beautiful seasonal wreath, an a simple doormat. For some extras, you can add a few lanterns, planters or other decor. When in doubt, keep it simple! Too much clutter will be a distraction.

Jenna’s Journey to Real Estate

5 years ago, I was simultaneously planning our wedding and staging my first $3 million modern home in the Oysters Shores community of East Hampton. That first staging project lit a fire in me that I was not expecting. I loved working with the owners to make decisions and trying to fill an empty space with comfort, beauty & functionality.


I’ll never forget Joe and I hustling in the days before our wedding to get all the furniture moved into the house. We didn’t hire a crew to help, we just did it all on our own. Talk about the best pre-wedding workout!

I literally put the finishing touches on the house and drove to Montauk for our rehearsal dinner. It was an exciting time, and naturally, I learned a lot from that project.

Jenna at her first design project

Jenna at her first design project

below the barn: lululemon + SoulCycle collaboration

below the barn: lululemon + SoulCycle collaboration

After that summer, I went back to work at lululemon. I was intrigued by the investment they were starting to make in The Hamptons community with events and a functional yoga/event space in their store. Somehow, they trusted me with a side job of designing & staging a space in partnership with Soulcycle. This was so different from the Oyster Shores house but was thrilling. What would it take for me to turn a blank canvas into a store, juice bar and yoga studio?

In those early days, it often felt like I was building the stairs while climbing them. Somehow it seemed to work and the end result was beautiful (and always gave me a stack of to-dos for next time). I loved the work I was getting but decided it was time to get some formal training. So I started studying design at the NY Institute of Art & Design and waited for my next opportunity.

In 2018, our personal goals started to really take shape. Joe and I bought our first home in Hampton Bays, which we saw as a great rental property. We closed Memorial Day Weekend and immediately staged & rented it out for the summer. We moved out of our apartment that fall and into the Hampton Bays house for the winter. 3 months later we found another home in East Hampton that was the perfect fixer upper that I’d been dying to get my hands on.

We somehow managed to get the house and (again) closed Memorial Day weekend and got to work. We did minimal fixes just to make it comfortable to live in and planned for a bigger renovation down the line.

Fast forward to January 2020, I was 5 months pregnant and we made the late call to renovate the kitchen, bathrooms and refinish the floor before the baby came. I designed the whole thing and loved dreaming about the possibility in this little Springs ranch. I was so excited to see the whole process and was excited to have a fresh living space for the newborn days ahead.


Well … everyone knows what happened in March 2020. We tore up our kitchen --down to the studs-- and 4 days later NY shut down due to the pandemic. I was working from home thinking I’d be home for 2 weeks and then ended up never going back before my maternity leave started in late May. We were living and working in a construction zone for 3 months just praying we would be able to get the project done before the baby came. Delay after delay kept coming up. Every week a new list of businesses were shutting down. Joe literally put our cabinets together himself and finally, we were just waiting on the local granite shop to reopen so we could get our counter tops. In the end, counter tops were installed a week before my due date and baby was 2 weeks late. Talk about cutting things close.

Around that same time—very tragically— I lost my younger brother. It’s an incredibly sad story of addiction and losing support during a global crisis. My world was turned upside down and I was 41 weeks pregnant. I gave birth and 3 days later was his funeral. Everything felt so fragile. Life felt precious & fleeting. In hindsight, I was dealing with postpartum depression and anxiety on top of grief, but I somehow had the clarity in my sadness that it was time to only spend time doing the things I love. Life was too short and I wouldn’t waste it on someone else’s plans for me.

That August I buckled down and get my real estate license. Everything was done via zoom except the exam, so I had my airbuds in taking class while simultaneously changing diapers and feeding the baby.

I’ll never forget when it came time to take my exam. Aurora was 3 months old and I wasn’t ready to leave her yet. The testing site was up-island and would take at least half a day to get there, take the test and get home. Joe, being a huge support to me always, drove all of us to Happaugue. I ran inside, in my mask, to take the exam and he carried Aurora around the parking lot making business calls. I was anxious, nervous, excited, and ultimately, felt confident I’d passed. (I did, by the way)

WFH vibes

WFH vibes


In many ways, I’m still learning a new job but I also feel grounded in an industry I’ve known for a few years. I have many dreams for our future and our business, but for now I’m enjoying the flexibility of working during nap times and getting the opportunity to watch my little girl change week by week.

They really don’t stay small forever, do they?

Turning your home into a great rental property

Renting or selling your Hamptons home may seem simple enough, right? There is a hug influx of people visiting for the summer season (or longer now as the pandemic continues) and it should be very simple to put your home on the market and find a tenant or buyer.

Just like any business, you want to make sure that you are appealing to your customer base and presenting a great product. In real estate, this is done with home staging. In The Hamptons, this means creating a luxe but comfortable coastal style with everything your guests need for an amazing summer. I truly believe this can be accomplished in any size home—with or without a pool.


Let’s take a look at my top tips for ensuring your home is set up to be a great rental:

UczqoBUg.jpg
  1. declutter


This may be the most difficult step. It can be the most time consuming but it is also the most rewarding. The brain registers clutter as chaos so when a buyer or potential tenant enters your home, they immediately register the chaos and not the tranquil, beach vacation vibes they’re hoping for. Go through each room in your home (even the bathroom!) and get minimalist.
Picture a hotel room. What is on top of the dresser? How about the bathroom vanity? Usually, next to nothing. Avoid storing things on the floor in baskets or large appliances on your counters like mixers or blenders. It’s best to tuck these away or get rid of unnecessary items entirely.
If you’re renting your home, you can designate a closet in your house to keep your belongings. Just change out the lock to have a key and you can stow away all your beloved pieces until you move back in.

15-3.jpg

2. Depersonalize.


Tuck away important family heirlooms and remove family photos from bookcases, dressers and nightstands. Take down large family portraits or wedding photos hanging on the walls and replace with ocean photography or abstract artwork in ocean tones.
Depersonalizing also means taking an objective look at your furniture and decor pieces. You may love that dark leather lazy-boy that is super worn in, but it screams “very personal” and not luxury vacation home. Assess your color palate in each room as well as linens. What adjustments do you need to make? Is it time to swap that bold wallpaper for a simple, light colored paint? Do you need to refresh the beds with all white linens and a new comforter? Do you need to change out some artwork on the walls? Try to put aside your emotions and look at everything through your potential tenants eyes.

F7630161-CA93-49E8-A084-27F2FADEE187.jpg

3. Choose Beach Decor Carefully


It is very easy to go from classy beach decor to tacky. Not every piece in your home needs to scream “WE’RE AT THE BEACH’’ There is a subtle art to coastal decor and the elegant, peaceful vibe comes from a less is more mentality.
Avoid too much signage that say cliche phrases like “Life is better at the beach” and “Toes in the sand, wine in my hand.” If you love signs, go for 1 or two signs that emphasis the town you’re in. For instance, a handmade wooden sign that says Sag Harbor if your house is in Sag.
A surfboard can be a great piece of decor if you have a huge blank wall and don’t know what to do with it. If your budget allows, Grain surfboards are literal pieces of art that bring in the warmth of wood.
Again, keep things as clean & minimal as possible. Opt for white or light wood furniture. Keep any linens, bedding or pillows in ocean tones (white, light neutrals, blues) without buying towels that actually have seashells or starfish on them.

 
42C916BB-0FCD-400F-91EF-A187EE3FCAE2.jpg

4. Don’t forget the outside


A great rental does not need to have a pool, but it does need to have a comfortable outdoor space. Fire pits, grills, patio seating— these are all essentials in a summer home and are fairly simple to create even if you don’t have a patio. My top tip for outdoor spaces is to make sure there is ample lighting. The most charming way to do this is with garden lights. These make summer nights magical and will make the outdoors feel like bonus square footage.


5. The “extras”


If your home is bike-able to the closest beach, included 2 beach cruisers. If you’re around the corner from the bay, buy a paddle board or kayak. Do you have an empty basement? Add a ping-pong table. These “extras” elevate your rental at a minimal cost to you. Think of all the fun summer things you enjoy and do your best to ensure your guests have access to these as well.

6BAB7366-9192-4D22-B22C-E7231185DB87.jpg
 

Every home has it’s own charm and uniqueness.

It can be challenging to shift through a very lived in space to make it appealing to buyers and renters.  If you need help with your home, please reach out below for our home staging offerings and to schedule a consultation.

We would love to help turn your home into a great summer rental property!